Wednesday, February 28, 2007
Hull Panels
Took a break last night to watch the movie "Half Nelson" (avoid it unless you have a soft spot for crackhead middle school teachers), but I got a little more done today. Started on the second half of the hull: a little more grinder-based wood mangling, cleanup with the random ordit, and I was able to place the splices on one face of the panels. Tomorrow I'll flip them and do the other face. That should give me a couple days to glue up the stringers before the weekend. With the transom, stringers and hull panels all finished, I can start the process of building the boat. I'm going to have to order the adapter that allows my sander to attach to a shop-vac hose. The amount of dust the thing puts out is outrageous. The garage looks like it's had a liberal dusting of paprika right now.
Sunday, February 25, 2007
Slow Progress
Well, when I woke up this morning, I went and checked on my splices again. I think that I got a little overzealous in smoothing out my peel ply last night and starved the glass in a few spots. Luckily the epoxy was still green and I was able to fill the few voids that there were without worrying about sanding. That meant that I had to wait all day for the patches to get green before I could flip the panels and do the other side. On a plus note, the splice sits lower than a straight edge when you set it across the joint. Should make for easy fairing. In the meantime, I glued up the transom. I precoated all three layers with resin (the West rollers worked great for this), and then mixed up a 6 oz. batch of the Gel Magic glue. This stuff is a biatch to measure. The resin portion must be squeezed out of the bottle in a big tube. It's like a huge bottle of that blue gel toothpaste. If you give it a minute in the mixing cup, it will settle down and you can see how much you have. Repeat this process ad nauseum until you have the appropriate amount. Why they don't give it to you in a tub, I don't know. The hardener reeks, but at least can be poured. Mixing the two portions together is tough at first but it seems to thin as you go. When the blue and orange components are mixed together, they go clear. The stuff just has some really unusual physical properties.
Once it was mixed, I used a notched spreader to cover the first layer of ply .......... about half way. Back to the blue toothepaste to make up a 12 oz. batch. Repeat process. When the three layers were laminated together, I put a piece of MDF with 3 trolling motor batteries on it on top. The idea is to try and eliminate some of the significant warping the plywood had when it arrived. I know the epoxy needs a gap to work and you shouldn't put too much weight on it, but it damn sure has a gap with the way my transom pieces are taco'ed up. I'm currently stressing out a little based on the fact that there wasn't much glue squeeze out from the edges of the piece. The Gel Magic is pretty thick, but the transom only holds the motor on the back of the boat. Just a minor piece. There's a transom under this mess somewhere.

By this point, I was able to flip the hull pieces and put another fiberglass splice on. I couldn't afford a belt sander, so I bought a cheap grinder with 36 grit discs to cut my trenches for the tape. Good lord, will a grinder kick a piece of plywood in the face! I'm far too unskilled to be using this tool for this application, but I am told it is useful for a lot of things later in the build. Once the trenches were cut, the application went smoothly now that I have a better idea of how much resin the tape needs.

Throughout the course of the day, any extra resin left in the pot was put on the hull panels. They'll all get coated eventually anyway.
So that's where it stands now. Half of the hull panels are assembled, and the transom is glued up. Two more hull panels and the stringers and I'll be ready to set up the frames on the strongback. Later on in the build, I'll have enough room, but I'm really wishing I had more right now. I would be further along on making these panels. Thus far, my saving grace has been how much working time these epoxies allow. I ordered slow hardener for the laminating resin, and I'm glad I did. It takes longer, but makes things less stressful. The Gel Magic definitely kicks off faster, but when it's spread out on a part it's not too bad.
Once it was mixed, I used a notched spreader to cover the first layer of ply .......... about half way. Back to the blue toothepaste to make up a 12 oz. batch. Repeat process. When the three layers were laminated together, I put a piece of MDF with 3 trolling motor batteries on it on top. The idea is to try and eliminate some of the significant warping the plywood had when it arrived. I know the epoxy needs a gap to work and you shouldn't put too much weight on it, but it damn sure has a gap with the way my transom pieces are taco'ed up. I'm currently stressing out a little based on the fact that there wasn't much glue squeeze out from the edges of the piece. The Gel Magic is pretty thick, but the transom only holds the motor on the back of the boat. Just a minor piece. There's a transom under this mess somewhere.
By this point, I was able to flip the hull pieces and put another fiberglass splice on. I couldn't afford a belt sander, so I bought a cheap grinder with 36 grit discs to cut my trenches for the tape. Good lord, will a grinder kick a piece of plywood in the face! I'm far too unskilled to be using this tool for this application, but I am told it is useful for a lot of things later in the build. Once the trenches were cut, the application went smoothly now that I have a better idea of how much resin the tape needs.

Throughout the course of the day, any extra resin left in the pot was put on the hull panels. They'll all get coated eventually anyway.
So that's where it stands now. Half of the hull panels are assembled, and the transom is glued up. Two more hull panels and the stringers and I'll be ready to set up the frames on the strongback. Later on in the build, I'll have enough room, but I'm really wishing I had more right now. I would be further along on making these panels. Thus far, my saving grace has been how much working time these epoxies allow. I ordered slow hardener for the laminating resin, and I'm glad I did. It takes longer, but makes things less stressful. The Gel Magic definitely kicks off faster, but when it's spread out on a part it's not too bad.
Saturday, February 24, 2007
Finally Some Epoxy
My build crew has abandoned me for the weekend, so no kickass action shots. Seems things like "working on their own boat" or "snook fishing" in "Tampa" are more exciting that watching me cut out hull panels. It boggles the mind. Anyway, I finally got everything cut out today. Most of the hull panels have to be cut in duplicate, so I stacked one panel on top of another to cut them. The cordless circular saw just couldn't hang, so I just went with a standard model that I own. Much easier. I should have just used that from the beginning. Unfortunately, in my excitement of cutting the very last panel, I forgot that it isn't doubled. I now have two extra tips for the front and tide panels and more stringer material than I need. I ordered one extra sheet in each size of ply to account for any screwups and man did I use the 1/4" one. Oh well. If this is the biggest screw up I make, I'll be pumped. I should be able to use a lot of the pieces as source for cleats and backing plates.
After getting everything cut out, it was time to start glassing. Because I don't have enough room, I have to use the strongback as a laminating table to glue up all my long hull panels before I can set up all the frames for stitching. First I put down plastic, so I don't glue everything to the table.
 I aligned one side panel and one bottom panel on the strongback and then shot a few finish nails though them to keep them from moving. The build notes suggest that anywhere a fiberglass splice is made the ply be ground down to aid fairing later. A belt sander or even an angle grinder would be the best tool for this. I had an RO. It took a while, and I'm not sure I took enough off, but I got through one ply anyway.
 Please disregard the uneven way the the panels meet. One is cut too fat and I figured it would be better to smooth then after they're joined. Two seems per panel.

Next I laid out everything that I would need to make each splice. A piece of 12 oz. biaxial tape cut to size and a sheet of plastic as poor man's peel ply.
 The only experience I've had with glass is the 6 oz. woven cloth on Frank's canoe. This stuff is way burlier, basically two layers of glass at 45 degree angles held together with cotton or linen stitching. It's much more difficult to wet out.
Each joint was precoated with the Silvertip laminating resin. The glass tape was laid on and then resin forced into it with a paintbrush. Then the plastic sheeting was put on and smoothed as best as possible using both hands and a piece of PVC like a rolling pin. A curing splice looks like this.
 The excess glass will be trimmed off when the epoxy is "green". This means its partially cured, with a consistency something like that of cheese.

This is where things stand after almost a full day of work. I would really like to reach a point where I can set up the frames and start stitching this week. A little more space would make this step much faster. Hopefully will have a new post tomorrow.
After getting everything cut out, it was time to start glassing. Because I don't have enough room, I have to use the strongback as a laminating table to glue up all my long hull panels before I can set up all the frames for stitching. First I put down plastic, so I don't glue everything to the table.
 I aligned one side panel and one bottom panel on the strongback and then shot a few finish nails though them to keep them from moving. The build notes suggest that anywhere a fiberglass splice is made the ply be ground down to aid fairing later. A belt sander or even an angle grinder would be the best tool for this. I had an RO. It took a while, and I'm not sure I took enough off, but I got through one ply anyway.
 Please disregard the uneven way the the panels meet. One is cut too fat and I figured it would be better to smooth then after they're joined. Two seems per panel.
Next I laid out everything that I would need to make each splice. A piece of 12 oz. biaxial tape cut to size and a sheet of plastic as poor man's peel ply.
 The only experience I've had with glass is the 6 oz. woven cloth on Frank's canoe. This stuff is way burlier, basically two layers of glass at 45 degree angles held together with cotton or linen stitching. It's much more difficult to wet out.
Each joint was precoated with the Silvertip laminating resin. The glass tape was laid on and then resin forced into it with a paintbrush. Then the plastic sheeting was put on and smoothed as best as possible using both hands and a piece of PVC like a rolling pin. A curing splice looks like this.
 The excess glass will be trimmed off when the epoxy is "green". This means its partially cured, with a consistency something like that of cheese.
This is where things stand after almost a full day of work. I would really like to reach a point where I can set up the frames and start stitching this week. A little more space would make this step much faster. Hopefully will have a new post tomorrow.
Friday, February 23, 2007
Quick Update
Haven't been posting much because I figured stories of me drawing line after line on sheets of ply would bore everyone. I've just been trying to get a little bit done every day after work. I've finally finished, and I'm hoping I'll have everything cut out tomorrow. Then the fun will really begin. One cool option on the FS18 is the ability to make the chine on the front 7 feet of the boat rounded. A hard chine above the waterline tends to trap all the little wavelets when your poling into the wind, creating hull slap. This usually isn't a big deal, but when you're in 6" of water the noise can spook fish before you get a shot at them. The only thing that will fully eliminate hull slap is a submerged chine, but a rounded one can help. This option requires the first couple frames to be rounded on the corners that define the chine, and that's what is shown below.
 This is the foward-most frame in the boat after rounding the bottom corners. Aslo, I'm now a Bosch convert. I bought the RO sander before I started because I heard that if you could only buy one decent tool, make it the sander. When my mom heard I was building a boat, she was told that I needed a good jigsaw and bought it for me. The sander is great (I'm sure I will hate to even look at it by the end of the build), but the jigsaw is fantastic. It feels like a sewing machine. It makes the Skil jigsaw that I bought seem like a hunk of crap. I guess a more accurate assessment would be that using it makes me realize the Skil IS a hunk of crap. I'm sure some of the other high end stuff is just as good or better, but these are good enough to be wasted on me. I'll have to work up to them.
Expect more updates this weekend. Hope to make some progress.
Sunday, February 18, 2007
Getting Busy
It was a long day today, but some significant progress was made.....on the actual boat this time!! The better part of the morning was spent laying out the patterns for the deck and frames on the 3/8" sheets of ply. With the Bateau.com plans there is no complicated lofting. All of the panels are cut from flat stock and all the measurements are contained in the plans. Simply draw them out on the ply.
 Curves are drawn by bending a flexible batten around finish nails driven into measured points on the ply.
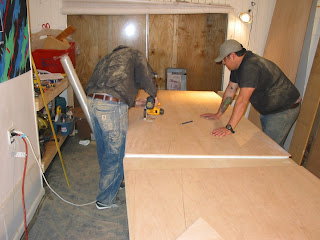
 Since they'll be showing up in pictures, I figure it's probably about time that I introduce my build crew:
 On the left is Frank of canoe strongback fame. His cedar strip canoe is coming along nicely, but he couldn't work on it today because he's waiting for the epoxy to fully cure. Building my boat would be the next logical place to be. On the right is Cole of redfish face-rocking fame. Frank is helping out due to his all around obsession with boats. Cole, my regular fishing partner, is helping out due to his obsession with more effeciently rocking redfish faces. Both motives I can understand and appreciate.
Anyway, back to the build. In order to have something to cut the panels on, we went ahead and enlarged the strongback to support the decks of the FS18. Basically, its shape now crudely follows that of the boat and is wide enough to keep everything from drooping.
 It's now shaped like a coffin. This pleases Cap'n Gnarly. It also varies less 1/16" in height over it's 16 foot run, so we're in biz for the next step.
Once the patterns are laid out on the ply, we place them on top of a sheet of blue insulation foam and start cutting. We used a borrowed cordless circular saw for this. It's weak, runs out of batteries and the blade sucks, but its small diameter makes it well suited to cutting the sweeping curves in the panels. It gives a fairer curve that a jigsaw would.
 Can you tell I was crawling around on the floor earlier? I won't show you a closeup of this cut because it looked like hell. Unfortunately, this saw's blade kicks sawdust to the front, obscuring the line right before you get to it. This makes cutting a little bit like randomly running a saw around on a real expensive sheet of plywood. We did come up with a very sophisticated solution, however.
 Cole blew the dust out of the way with the shopvac, while I cut. While completely bootleg, it worked great. This whole cutting process went on for a great deal of time and we were able to get all the deck, frames and transom pieces cut out of the 3/8" ply. We laid out the deck pieces to make sure our strongback would work and you can now kind of get an idea of what the deck layout will be.
 Just seeing the boat-like arrangement of the deck pieces it exciting. I can't wait to start wrapping hull panels. My shoddy cutting actually cleaned up pretty well in about 15 minutes with a new block plane that I bought. It's my new favorite tool. The next step will be to repeat the same process with all of the 1/4" panels. It takes longer than expected, but I hope to be slinging epoxy by next weekend. We'll see.
The Captain got a new place to rest his weary bones today too. A test piece from when I was playing around with my trial epoxy kit just happened to fit him perfectly, so we attached it to the wall.
 He can now more easily survey our work and rain down insults regarding both our craftsmanship and manhood. I'm beginning to think that the Captain's ships were not very cool places to work. He was definitely not impressed with my cutting today.
 Curves are drawn by bending a flexible batten around finish nails driven into measured points on the ply.
 Since they'll be showing up in pictures, I figure it's probably about time that I introduce my build crew:
 On the left is Frank of canoe strongback fame. His cedar strip canoe is coming along nicely, but he couldn't work on it today because he's waiting for the epoxy to fully cure. Building my boat would be the next logical place to be. On the right is Cole of redfish face-rocking fame. Frank is helping out due to his all around obsession with boats. Cole, my regular fishing partner, is helping out due to his obsession with more effeciently rocking redfish faces. Both motives I can understand and appreciate.
Anyway, back to the build. In order to have something to cut the panels on, we went ahead and enlarged the strongback to support the decks of the FS18. Basically, its shape now crudely follows that of the boat and is wide enough to keep everything from drooping.
 It's now shaped like a coffin. This pleases Cap'n Gnarly. It also varies less 1/16" in height over it's 16 foot run, so we're in biz for the next step.
Once the patterns are laid out on the ply, we place them on top of a sheet of blue insulation foam and start cutting. We used a borrowed cordless circular saw for this. It's weak, runs out of batteries and the blade sucks, but its small diameter makes it well suited to cutting the sweeping curves in the panels. It gives a fairer curve that a jigsaw would.
 Can you tell I was crawling around on the floor earlier? I won't show you a closeup of this cut because it looked like hell. Unfortunately, this saw's blade kicks sawdust to the front, obscuring the line right before you get to it. This makes cutting a little bit like randomly running a saw around on a real expensive sheet of plywood. We did come up with a very sophisticated solution, however.
 Cole blew the dust out of the way with the shopvac, while I cut. While completely bootleg, it worked great. This whole cutting process went on for a great deal of time and we were able to get all the deck, frames and transom pieces cut out of the 3/8" ply. We laid out the deck pieces to make sure our strongback would work and you can now kind of get an idea of what the deck layout will be.
 Just seeing the boat-like arrangement of the deck pieces it exciting. I can't wait to start wrapping hull panels. My shoddy cutting actually cleaned up pretty well in about 15 minutes with a new block plane that I bought. It's my new favorite tool. The next step will be to repeat the same process with all of the 1/4" panels. It takes longer than expected, but I hope to be slinging epoxy by next weekend. We'll see.
The Captain got a new place to rest his weary bones today too. A test piece from when I was playing around with my trial epoxy kit just happened to fit him perfectly, so we attached it to the wall.
 He can now more easily survey our work and rain down insults regarding both our craftsmanship and manhood. I'm beginning to think that the Captain's ships were not very cool places to work. He was definitely not impressed with my cutting today.
Saturday, February 17, 2007
Getting Ready (Part II)
Arriving faster than I expected, both my plywood and epoxy/glass supplies showed up midweek, so this weekend I have no more excuses. It's time to get down to business. This is what ~$1900 worth of plywood, epoxy, glass and various boatbuilding accoutrements looks like.

The plan is for that stack to one day be a boat. If you just felt something shake, it was probably all the redfish around Steinhatchee trembling. All of the epoxy products are SilverTip from System 3. Nice Stuff. The plywood is BS1088 Meranti marine ply. Looks like finish ply, but is suited to the marine environment. It's a little heavier than Okoume, but is also stronger and cheaper.

Today we spent the better part of the day getting rid of all the excess junk in the garage, cleaning up, laying down plastic on the floor, and gathering the supplies we'll need for tomorrow.

Not exactly exciting, but now we have a suitable build site and will start the real stuff tomorrow. The FS18 is typically built on a strongback consisting of two 16' 2x6's. The deck is placed upside down on these and then the frames are attached. The hull is bent around the frames. My build will differ slightly from this in that I will use an MDF strongback donated from my friend Frank's cedar strip canoe build. He's already done a lot of the hard work in getting a level, square work surface when he built this, so I'm going to take advantage of it. Here's the strongback from the canoe.
 The top will be replaced with one more suited to the size of the FS18.
And lastly, it's about time that everyone was introduced to the mascot/director of the build. Scourge of legitimate maritime commerce, king of the high seas, authority on all things nautical.......it's Cap'n Gnarly.

His cruelty is legend. And as you can see, some dirty bastard broke all the fingers off his right hand. Thus far he is none too impressed with our handiwork. We're hoping that will change. When asked to comment at least on the merits of the design, he responded with, "Aye. A fine craft she is......... a fine craft, no doubt." That's high praise coming from one as grizzled as the Cap'n.
Wednesday, February 14, 2007
Getting Ready
Seeing as how my garage has been used mostly for storage up to this point, getting ready mainly involved throwing stuff away and making space. The second major hurdle was the fact that my garage is 18 feet long. The boat is also 18 feet long, so the back of the building space had to be extended. One side of the sliding glass door was coaxed forcibly from it's tracks and a four foot extension was built out onto the porch. It won't exactly be roomy in there, but at least it's possible now.

I may hit it with a quick coat of paint to stealth it from the neighbors.

I may hit it with a quick coat of paint to stealth it from the neighbors.
Tuesday, February 13, 2007
The Program
I've been searching for some time for skiff to meet my needs:
The East Cape Canoe Gladesmen......

And the Hells Bay Glades Skiff.....

The Glades Skiff had a very limited production run and pictures are difficult to find on the web. It has a similar shape to the ECC, but is a slightly more substantial boat. Hell's Bay went under, but has been bought out and it looks like Glades Skiffs may be produced again. The ECC runs around $9K and the HB runs around $15K. Both without power. Both well out of my price range. I've been toying around with the idea of building a boat for a while now, but haven't found a design that meets my criteria. However, with input from his customers, Jacques Mertens at www.bateau.com designed a boat that meshes well with my needs. He named it the Flats Stalker 18 and the study plans can be found here:
http://www.boatplans-online.com/studyplans/FS18_study.htm
It is functionally very similar to the production boats listed above, but built using a next generation stitch and glue method. This involves hull panels and frames of marine plywood encapsulated in layers of epoxy and fiberglass. This method results in a true composite sandwich that is in some ways superior to standard production methods. The skiff is very basic but should let me get the jump on those spooky reds. The best part is that a hull can be built with the best available materials, nicely outfitted and still only cost around $3000.


- Adequately powered by a 15 hp motor that I already have.
- Very shallow draft in order to target tailing redfish.
- Easily poled for the same reason.
- Front casting deck suitable for flyfishing.
- Can fish 2 people. 3 max.
The East Cape Canoe Gladesmen......

And the Hells Bay Glades Skiff.....

The Glades Skiff had a very limited production run and pictures are difficult to find on the web. It has a similar shape to the ECC, but is a slightly more substantial boat. Hell's Bay went under, but has been bought out and it looks like Glades Skiffs may be produced again. The ECC runs around $9K and the HB runs around $15K. Both without power. Both well out of my price range. I've been toying around with the idea of building a boat for a while now, but haven't found a design that meets my criteria. However, with input from his customers, Jacques Mertens at www.bateau.com designed a boat that meshes well with my needs. He named it the Flats Stalker 18 and the study plans can be found here:
http://www.boatplans-online.com/studyplans/FS18_study.htm
It is functionally very similar to the production boats listed above, but built using a next generation stitch and glue method. This involves hull panels and frames of marine plywood encapsulated in layers of epoxy and fiberglass. This method results in a true composite sandwich that is in some ways superior to standard production methods. The skiff is very basic but should let me get the jump on those spooky reds. The best part is that a hull can be built with the best available materials, nicely outfitted and still only cost around $3000.


Subscribe to:
Posts (Atom)


